fontas food

eating my way through suburbia

Tuesday, December 18, 2007

A Taste of Home: Butter Tart Square

It wouldn't be Christmas in just about any Canadian home without butter tarts. Mince tarts can be a "take it or leave it" affair but butter tarts? They are the quintessential Canadian dessert and arguments have been fought over what makes the perfect butter tart.

Runny or firm, raisins or nuts...those questions fade into the background when asked the basic question of "Do you like butter tarts?" Everyone loves butter tarts.

Making butter tarts requires either far more patience than I possess or a source for frozen tart shells. Here in Sacramento, it can be a little difficult to find frozen tart shells. Over the past eight years, I've had intermittent success in finding tart shells at the Safeway on Greenback and San Juan and I've also seen some rather expensive ones at Corti Bros.

Faced with the scarcity of frozen tart shells, I was thrilled to see "butter tart squares" on the table at both of my sisters' homes during my recent trip home. Besides making the quest for frozen tart shells moot, the recipe for these dainties combines two of the best tastes of Christmas baking: butter tarts and shortbread.

Yesterday, they graced my table too.


Butter Tart Squares
(adapted from a recipe from Best of Bridge)

Base:
1 cup butter
2 cups flour
1/4 cup sugar
1/4 tsp. salt

Topping:

1 cup raisins
1 T. flour

3 eggs beaten
2 cups brown sugar
1 T. baking powder
1/2 T. vanilla

1/4 cup butter, melted

Preheat oven to 350.

Using a pastry cutter, combine butter with dry ingredients until the mixture is crumbly (it will look similar to pastry dough before the addition of any liquid). Press the mixture into an ungreased 9x13 pan. Set aside.

In a small bowl, combine raisins and flour. Mix well so that no raisins are still clumped together. Set aside.

In a medium bowl, mix eggs, brown sugar, baking powder, and vanilla. Slowly add melted butter. Add in raisins and stir well.

Pour topping mixture over shortbread base and bake for 35 minutes.

Allow to cool completely before cutting.
Bread Pudding...for breakfast!

This past weekend, we hosted an impromptu neighbourhood brunch to start off our Christmas season. The idea came from seeing a loaf of Dutch sugar bread (suikerbrood) in my freezer. I'd made the bread a couple of months ago and frozen one loaf. When I saw it sitting in the freezer, it just seemed to be crying out to me..."Make me into some breakfast bread pudding!"

And so I did!


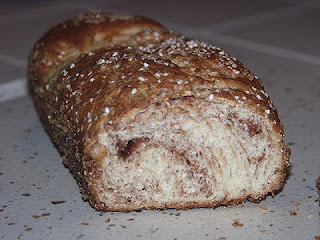
Dutch Sugar Bread

This is adapted from a recipe from Klary Koopsman on eGullet. (Original recipe is here and adaptations thereof are here and here.) The batteries in my camera packed it in so the photo is of the bread I made a year ago.

Using the suikerbrood, I made French Toast Bread Pudding from Epicurious.

What a great way to start off the holiday season!

Wednesday, December 12, 2007

The True North (the best place to get real fish and chips!)

I'm back from my trip to the true north (strong and free) and I'm happy to report that I was able to fulfill both of my culinary checklist items. I picked up a bottle of HP sauce to bring back and I ate some "real" fish and chips.

"Real" is, of course, a relative term. Here in Sacramento, Fins serves a tasty "fish and chips" dish but, if "fish and chips" means battered fish to you, then breaded fish doesn't quite taste "real". I won't even mention the "chips" here.

When I was a teenager, I worked in a fish'n'chip shop as a waitress/kitchen help. Mercifully, we had a mechanical potato peeler so that task didn't need to be done by hand but chipping the potatoes was definitely done in the old-fashioned manner.

Once the potatoes had been peeled (in case anyone is wondering, think "rock tumbler for potatoes"), they went into large garbage cans along with water and "whitener". Whitener stopped the potatoes from discolouring; perhaps it involved phosphates or something. At any rate, when we were low on chips, the garbage can would be dragged over to the chipper, a wall-mounted, lever-operated machine-thingie. An empty container was positioned under the chipper and then the fun began!

Using a chef's knife, I'd stab a potato and hold it in place in the chipper. Pulling on the lever would bring the top blade down and hold the potato while I pulled out the knife. Then a lot of upper arm muscle action would force the blade through the potato. Chips would fall into the waiting bucket and I'd be reaching for another potato.

Needless to say, those types of chips are hard to find in Sacramento. When I planned my trip home, I also decided that it was time to remind myself what "real" fish and chips tasted like. My mum and sister met me at the airport in Victoria and we made our way directly to Haultain Fish and Chips. Willows Galley on Estavan has excellent fare but is limited in the way of seating; Haultain seemed to be the logical alternative.

I wasn't disappointed.


And there it is...my idea of "real" fish and chips. Halibut fillet, battered (but not too heavily), and fried. Served along with chips and coleslaw.

Heh. The rest of Sacramento doesn't know what it's missing.

Tuesday, December 04, 2007

Onion Pie

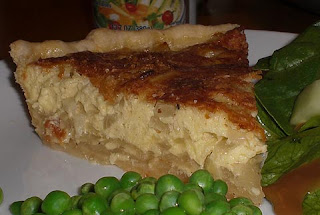
The other day, the Spouse and I were watching the Food Network, a show on a pie competition. Amid all the apple pies and the cream pies, one contestant's pie really piqued our interest: onion pie.

The Spouse decided he would try to recreate the dish; although no recipe had been given, enough of the ingredients were discussed to give him a good idea of how to go about the task. It was an unqualified success:


This is definitely going to make an appearance on our table again and, now that the Spouse has the basics down, I'm sure he's going to want to start experimenting.

NB: If only I'd thought to check the Food Network site earlier! The recipe for the pie we saw on TV is available here: Vidalia Onion Pie. This is close to what I think W did but it's not exactly the same.

Friday, November 30, 2007

More Humble Food: Meatloaf (Part 1)

After the fun and excitement of our neighbourhood corned beef hash cook-off (Part 1, Part 2, and Part 3), we decided to embark on another cooking series; this time around, we'd tackle meatloaf.

As with the hash off, we discussed in advance the features that might make up our ideal meatloaf. In a perfect world, a meatloaf would be moist but firm and dense enough to slice without crumbling. It would be seasoned perfectly and taste meaty. Finally, we discovered that none of us were fans of glazed meatloafs; we wanted our meatloaf to have crispy edges.

Even though M was supposed to go first in this challenge, I felt like having meatloaf for dinner tonight and so I just went ahead and started us off. Here's my recipe for meatloaf:

Meatloaf


3 oz. fine dried breadcrumbs
1 tsp. chile powder *
1 tsp. thyme
1/2 tsp. salt
1/2 tsp. pepper

1/2 lb. ground pork (for the locals, I bought it from John Bledsoe at the downtown market)
1/2 lb. ground veal
1 lb. ground beef
1/2 onion, finely minced
1 egg

* I don't use the chili powder blend commonly available at the supermarket. I make a mixture of 2 parts California chile powder and 1 part New Mexico chile powder; both of these are available in the Hispanic foods section of the supermarket.

Preheat oven to 350. Prepare a half sheet pan by covering it with foil.

Combine the seasonings with the bread crumbs.

Mix together the three ground meats and then add in the bread crumb mixture and the minced onion. When everything is evenly combined, add the egg and mix until it is thoroughly incorporated into the meat mixture.

Line a 9-1/2" loaf pan with plastic wrap. Press the meat mixture into the loaf pan and then invert it onto the prepared sheet pan. (Use the plastic wrap to get the meat out of the pan and then discard it.)

Bake for roughly 1 hour or until the internal temperature of the meatloaf reaches 170. Remove from oven and tent with foil; allow the meatloaf to rest for up to ten minutes. Just before serving, put the meatloaf under the broiler until the top is crispy.


Slice and serve, baby.

Wednesday, November 28, 2007

Weeping Meringues

Now that Thanksgiving (my second one this year!) is over, I've got more time to get back to the important stuff...blogging!

One of the dishes I made for the big turkey party was a lemon meringue pie. Going into the day, I had no worries about how the meringue would turn out but, by the end of that Thursday, I would rue my devil-may-care approach.

I used a recipe from Susan Purdy's As Easy as Pie (great book, by the way; I highly recommend it). The only change made to the recipe was the use of Meyer lemons rather than the standard Eurekas or Lisbons (hey! they were free!).

There is no doubt about it; the pie looked fabulous!


But a closer look showed that all was not perfect with my pie...


The shrinkage of the meringue is clearly visible in this photo but what might be a little less clear is the amount of weeping that went on. I swear, that pie wept more than a hormonal teenager at a chick flick.

So what causes meringues to weep?

I did a little googling today and found a variety of reasons proffered. The one that made the most sense to me was the uneven cooking of the meringue caused fluid in the egg white foam to be released as the meringue cooled.

So how to combat this problem? One solution is to put the meringue on hot filling before baking it. Another is to add a wee bit of cornstarch to the meringue (although this apparently changes the texture...like gobs of syrup don't!). I suppose baking the meringue separately and then sliding it onto a cooled, filled pie might work too.

Any good ideas out there?

Friday, November 09, 2007

Recipe : Corned Beef and Tomato Pie

After reading about "The Ugliest Gourmet" event on IMBB, I immediately knew what I had to make for dinner...corned beef and tomato pie. The rules were simple; blog about a delicious but disgustingly ugly food.

Corned beef and tomato pie has a long history in my family; my sisters and I are now the third generation to make this delicious meat pie for our families. Family lore has it that our grandmother read an article in a newspaper (or maybe it was a magazine) in which Bing Crosby's mother provided a recipe for "corned beef and tomato pie".

In this world of Google, I've able to find what appears to be the original recipe; it's not what Nana made though. The original looks like it is for individual servings of the corned beef mixture wrapped up in biscuit dough. Nana's version put the filling in a double-crust pastry shell thus becoming a satisfying meat pie.

The combination of corned beef and tomato is an inspired one; the acid of the tomatoes helps cut the sometimes-fatty nature of corned beef. And who doesn't like pie?

Corned Beef and Tomato Pie

Crust:

2 cups flour
1/2 tsp. salt
2/3 cups lard
5 to 7 T ice water

Filling:

2 T. butter
2 T. flour
1 14-oz tin whole tomatoes, chopped and undrained
1 tin corned beef, cubed

Preheat oven to 425 F.

The instructions for the crust are your typical how-tos on making pastry. If you have a favourite pastry recipe (as long as it's not sweet), go ahead and use it. If you hate making pastry and want to use store-bought, well go ahead and do that.

Otherwise, here are my instructions for pastry:

Combine the flour and salt. Cut in the lard until it looks a bit like wet sand. At this point, you start adding water, a tablespoon at a time. We've had no rain here for a while so I ended up adding all 7 tablespoons. When we lived on the coast, I don't think I ever added more than 5-1/2. So, just add as much water as you need to make the dough hold together.

Divide the dough in half and roll out one half to a roughly 10" diameter circle. Use this dough to line a pie tin and set the other half aside for a wee bit.

Moving on to the filling, melt the butter in a medium pan and, when it's melted, stir in the flour. Mix it thoroughly then add the tomatoes, along with any juices. Stir to combine well; it will thicken a bit as well. Add the cubed corned beef, stir to combine, then remove from the heat and let cool a bit.

While it's cooling, roll out the other half of the pastry dough. Put the filling into the pie shell and top with the remaining pastry. Seal the edges by folding the top crust under the bottom at the edges and crimping them together; then you'll need to cut some vent holes in the top.

(My mum always used scissors to cut the vents in pies and it makes a really neat little divot when you do. I highly recommend using scissors.)

Bake at 425 F for 15 minutes and then reduce the oven heat to 350 F. Continue to bake for 45-50 minutes, or until the top is nicely browned. Remove from the oven and let it cool for 10 minutes or so; the pie will still be hot but it will be much easier to cut and serve.

[...]

So, with the history of this pie and the recipe for it out of the way, we can proceed to why this is a good dish for "The Ugliest Gourmet".

It might be one of the ultimate comfort foods but, unfortunately, the filling of this pie looks somewhat less than appetising.

Here it is ready to be topped by pastry and also a close-up of a slice...


Now, Mum, don't take offense but I can't be the only one that thinks it looks like a pie made from cat sick...

Thursday, November 08, 2007

Sweet Mama Squash Chips

Winter squash has been making its appearance at the farmer's markets for the past couple of weeks now. The first acorn squash of the season was pretty grim but the next squash purchased, a beautiful red Kuri, was wonderful. My latest squash acquisition was a "Sweet Mama" kabocha squash, a completely new variety for me.

I'd looked at the Sweet Mamas for several weeks and thought they looked like they were covered in barnacles:


Maybe I've just been a little homesick for the ocean but this gnarled appearance spoke to me. And it was saying "Try me! Try me!"

I've never had any reason not to listen to the voices before and so I tried it.

Thanks to the internet, I discovered that kabocha squash was drier than others and could be treated the same way one might treat buttercup squash. No, that doesn't mean you hold it under your chin...when I checked the entry for buttercup squash, it mentioned a similarity to sweet potatoes.

This is not necessarily a good thing for me as I really do not like sweet potatoes. Well, unless they're made into a pie with pecans but that's for another day.

Well, I may not like sweet potatoes but I do like chips and so I decided I would make "sweet mama squash chips" to go with my dinner tonight. (Or, "sweet mama oven fries" for those who don't speak Jen.)

First, the squash was halved and seeded, then cut into quarters. Each quarter was cut into rough 1/4" slices and then peeled. The slices were tossed with olive oil and seasoned with salt and pepper.


The slices were then put on a sheet pan and baked in a moderate oven. After about 20 minutes, they were turned to brown up all sides.


Now, if I were really clever, I would have come up with a dip for these chips!